Category: Equipment

  • Testing and Measuring the Quality of your Cattle’s Winter Hay – PART 2: Testing Hay Quality

    Welcome to Part 2 of our blog series on Testing and Measuring the Quality of your Cattle’s Winter Hay. Please be sure to read Part 1 – Why should we care about hay quality?

    Today’s post will focus on the methodology of collecting a forage sample, the tools/supplies needed, and where you can send your forage sample for analysis.

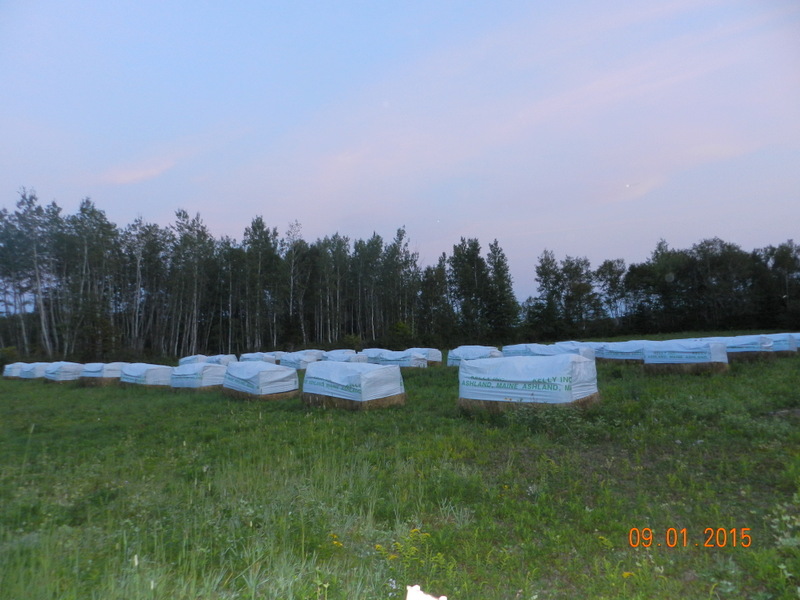
    We live in Northern Maine and send our hay samples to Dairy One and their Forage Testing Laboratory, based in Ithaca, New York.

    Their website is extremely user-friendly, and their instructions for collecting a forage sample are thorough and easy to understand. Further, they even provide forage analysis kits and other supplies to help with the sample collection process.

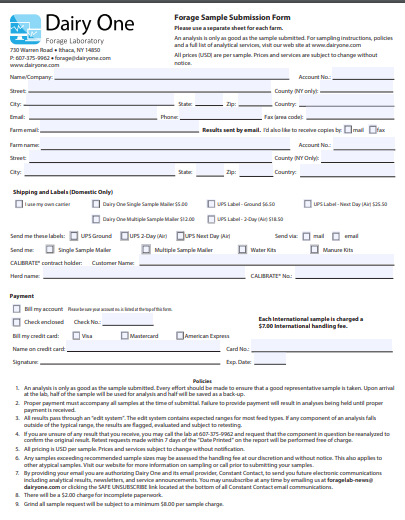
    Their Forage Sample Submission Form is available online, as well as a step-by-step guide to Collecting a Forage Sample.

    Forage samples need to be submitted in a quart-sized plastic bag within a Dairy One Forage Analysis Laboratory mailer envelope. For our purposes, we will be discussing the methodology of collecting a HAY sample. Please see the guide for Collecting a Forage Sample, for all other forage types.

    Steps for Collecting a Hay Sample
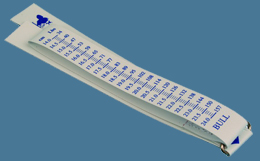
    Hay Probe Tool

    If you don’t already own one, you will need to purchase a Hay Probe tool. This tool will allow you to bore (or make a hole), through each hay bale. Using a hay probe to collect a core sample will allow for the most accurate nutritional breakdown of each of your particular sample lots. Also, the hay probes on the market today are extremely user-friendly and can be used to collect many samples, both efficiently and effectively by a single person.

    Determining Different Sample Lots (if applicable)

    Be sure to determine your sample lots.

    Let’s say you purchased hay from two different hay producers, and their hay bales are from two different cuttings, a month apart:

    We have Producer A, with cuts from July and August, each from a separate field, and we have Producer B, also with cuts from July and August in two different fields. That gives us 4 LOTS to sample.

    For the most representative and accurate analysis, the lab recommends that you sample 12-20 bales per lot, picked at random.

    Collecting the Hay Samples

    Supplies/Tools Needed:
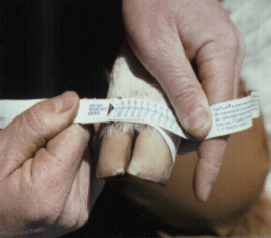
    Hay probe

    Clean bucket to collect hay samples

    Clean, quart-sized plastic zip lock bags

    Permanent marker to label each bag with Lot Name (e.g., Producer A – July Hay)

    Use your hay probe to bore into each bale in the appropriate location (see here for instructions for square and round bales). Empty the hay probe’s cleanout rod into your clean bucket, and then move to your next bale, adding each sample to the same bucket as you go along. After completing each lot, you should have 1 bucket with all of your samples. Mix the samples by hand in the bucket and fill your sample bag with approximately 1 pound of material (the lab recommends 2-3 good handfuls). Squeeze out as much air as possible and seal the bag. Repeat this entire process for each of your lots, being sure to keep your samples labeled.

    Place each labeled, quart-sized plastic zip lock bag sample into your Dairy One Forage Analysis Laboratory mailer, along with a completed submission form and place in the mail. The lab will test your samples based on the type of forage testing you select. We always select the Forage NIR testing, which is $18.00/sample. This analysis provides us with Crude Protein and Total Digestible Nutrition, as well as a wide plethora of other nutritional information on a Dry Matter and an As-Is basis. Results will be sent to the email that you provide on the submission form. You can also receive copies by fax or mail.

    Please see our final post in this series: PART 3: Receiving and Understanding your Forage Analysis Results

    Also, if you missed Part 1, please check it out here: Part 1 – Why should we care about hay quality?

    Thank you for reading!

  • Happy New Year 2016: Update on the Farm

    Happy New Year!

    099
    Heifer Red Angus calves – Winter 2016


    I can hardly believe that 2016 is upon us.  We are about a month into our winter hay bale grazing season and already looking forward to our 2016 calving season!  2015 was definitely a growing year for our farm, our cattle herd and our family.


    As with any farmer, there is always that driving force, that desire to be independent and self-sufficient, while at the same time having a productive, efficient and safe operation.  Since the   time we bought our first cows, back in 2013, we have dreamed of many things for our farm but specifically, we wanted a heavy-duty pickup truck and stock/gooseneck trailer, and a headgate, squeeze chute, alleyway and squeeze tub cattle facility.  We don’t live in the mecca of beef cattle country and as such, finding such items had been a challenge for us, especially in our limited price range.


    2532
    Our “new” headgate, squeeze chute/alleyway and crowding tub cattle facility


    It seems that the timing was finally right for us in 2015, and we were able to find and actually afford to buy a headgate, squeeze chute, alleyway and crowding tub cattle facility,

    2537
    Our “new” squeeze chute!


    129
    Our “new” heavy duty pickup truck and gooseneck trailer


    AND


    a heavy duty pickup truck and gooseneck trailer.


    All three are used and certainly have some wear and tear on them but are perfect for our needs.  We have always wanted to have the ability to transport our animals with our own truck and trailer and not have to rely on others.  In addition, we are always striving for having  safe and efficient ways to handle and work our cattle.

    3228
    Ear tagging a cow in our new squeeze chute and headgate


    It felt like Christmas morning when that truck and trailer came rumbling up our driveway, with Jer behind the wheel, grinning ear-to-ear and then again, the first time we worked our cows in our new cattle facility.

    We were so used to using our homemade, non-squeeze chute and alleyway that we forgot to use the squeeze part of the squeeze chute with our first cow!


    035
    Two of our 2015 steer calves.


    Shifting gears to our cattle herd, we were fortunate to sell all eight of our steer calves for a solid price – despite the fluctuations in the market.


    Red Angus heifer calf, C4, born on April 28th at 74 lbs.
    One of our top-pick heifer calves.


    We were also fortunate enough to be able to add on to our cattle herd by keeping six of our heifer calves and one bull calf.


    On the family front, we welcomed our second son into the world in early-November.  My husband and our veterinarian were down at the chutes doing pregnancy checks on a Friday afternoon, one day past my due date.  Our vet jokingly volunteered to help delivery our baby if need be. Luckily, baby decided to wait a few days!  Pregnancy checks went well, with 15 out of 17 cows pregnant.  We sold the two open cows and are now anxiously awaiting yet another calving season for our 15 mama cows.

    098
    Calves hay bale grazing – Winter 2016


    As I mentioned above, we are getting into our rhythm with yet another winter hay bale grazing season.  Our cows and calves are managed separately, and we have been pleasantly surprised at how easily our calves have adapted to hay bale grazing.


    3112
    Our sole winter hay bale grazing site for our cows.


    We have two sites set-up for hay bale grazing for our calves and one large site for our cows.


    As with every year, we have encountered a few hiccups with our hay bale grazing but we are working through them and trying to stay patient and positive while employing some creative problem solving techniques.  🙂

    We wish you all a very successful and productive 2016!

  • Estimating Calf Birth Weight

    For cattle producers with cow-calf operations, you may also be interested in our October 2019 post on: Beef Bull Castration: Using Castration Banders, including the Callicrate SMART Bander.  We also discuss our new approach of “delaying calf processing.” Be sure to check it out! Thanks!

    DSCN7948Birth weight is a genetically heritable trait in beef cattle that has a direct impact on cow-calf management.  On the surface, some might think that a bigger calf is better.  However, big calves often cause difficult births, and if a farmer or rancher isn’t around to assist with the birth, they can end up with a dead calf or, in some cases, a dead cow.  A small, live calf is much easier to sell in the fall than a dead one!  Plus, with quality genetics, many of the smaller-born calves will weigh just as much as their heavier-born companions in the fall.  On our farm we aim for a 65-75 lb birth weight.  Last year we had one calf born at 110 lbs.  Luckily we were present during the birth – we had to pull the calf, and would prefer to avoid having to deal with a calf born that big in the future.

    Since birth weight is so important, good managers often attempt to collect weights on most of their calves around the time of birth.  Seed stock producers do this routinely, as birth weight, along with assisted birthings are data they report to calculate EPD’s (expected progeny differences used to evaluate bulls).  Commercial producers often times will guess a calf’s birth weight, or place them in categories (i.e. small, medium, large).

    DSCN2817The most accurate method used to collect calf birth weights is by weighing each calf with a scale.  We use a spring scale that can be carried out in the field.  The calf is placed in a weigh sling and picked up with the scale.  Simple as that.  This method requires some extra work, and can be difficult to do when the momma cow is breathing down your neck trying to protect her calf.

    A less accurate, but quick method to estimate calf birth weight is the calf scale tape.  A while back, Marshall Ruble, from Iowa State University, found a strong correlation between a calf’s hoof circumference and its birth weight.  He determined that you could get a pretty good estimate of calf weight by simply measuring the circumference of the hoof.  Ruble developed a simple tape that can be placed around a newborn calf’s hoof and gives an easy-to-read weight.  One side of the tape is used for bulls, the other for heifers.

    CalfscaleColor-blue
    Calf Scale, from Ruble Cattle Services

    We used the calf scale tape last year and followed up by taking hoof diameter and spring scale weight on a couple of calves.  Though our sample size was low, we found that the tape gave weights very close to our scale weights.  A South Dakota State University study negated some of the claims of the Ruble Calf Scale, finding a relatively poor correlation between hoof circumference and birth weight, so you can take the information with a grain of salt. Some folks swear by the calf tape, and others refuse to use it.

    calfscaleinuse
    CalfScale, from www.rublecattleservices.com

    A number of methods are available for estimating calf birth weights, including visual guesses, hoof circumference and actual scale measurements, and each has its strengths and weaknesses.  If you’re interested in collecting birth weights of your calves to help improve management and make selection decisions, give these methods a try.

    For cattle producers with cow-calf operations, you may also be interested in our October 2019 post on: Beef Bull Castration: Using Castration Banders, including the Callicrate SMART Bander